Welcome to Maker Tech Lab! Today, we’ll show you a simple yet fundamental project: blinking an LED with an Arduino Uno. This project is perfect for beginners and provides a great introduction to programming and electronics.
Materials Needed

| Arduino Uno Buy at Amazon |

| LED Buy at Amazon |

| 220 ohm Resistor Buy at Amazon |

| Breadboard Buy at Amazon |

| Jumper Wires Buy at Amazon |
Circuit Diagram
Before we dive into the code, let’s set up the circuit. Follow the diagram below:


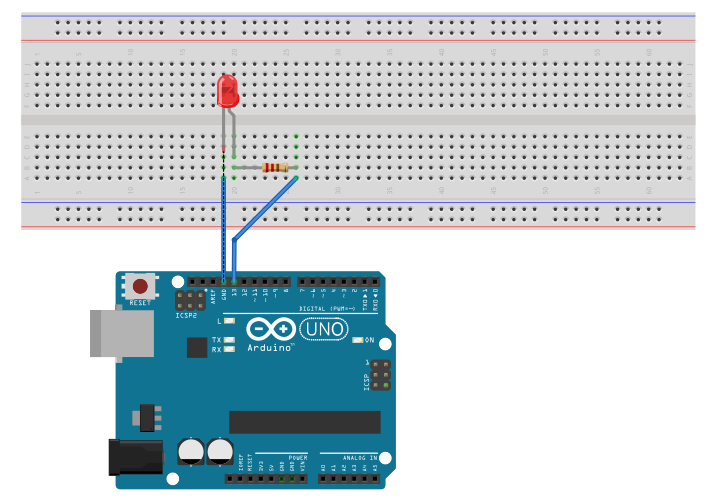
- Connect the LED: Place the LED on the breadboard. Connect the longer leg (anode) to a digital pin (e.g., pin 13) on the Arduino through a 220-ohm resistor.
- Connect the Resistor: Connect the other leg of the resistor to the Arduino ground (GND).
- Complete the Circuit: Connect the shorter leg (cathode) of the LED directly to the ground rail on the breadboard.
The Code
Let’s move on to the code. We’ll use the Arduino IDE to write a simple program that makes the LED blink.
const int ledPin = 13;// Pin number where the LED is connected
// Setup function runs once when you press reset or power the board
void setup() {
  // Initialize the digital pin as an output
  pinMode(ledPin, OUTPUT);
}
// Loop function runs over and over again forever
void loop() {
  digitalWrite(ledPin, HIGH); // Turn the LED on
  delay(1000);                // Wait for a second
  digitalWrite(ledPin, LOW);  // Turn the LED off
  delay(1000);                // Wait for a second
}
Explanation
- Pin Setup: We define the pin where the LED is connected.
- Setup Function: We initialize the pin as an output.
- Loop Function: This function runs repeatedly. It turns the LED on, waits for a second (1000 milliseconds), turns the LED off, and waits for another second. This creates a blinking effect.
Uploading the Code
- Open the Arduino IDE.
- Copy and paste the code into the IDE.
- Select the correct board and port from the Tools menu.
- Click the upload button.
Conclusion
That’s it! You’ve successfully created a simple LED blinking project with an Arduino Uno. This project forms the basis for more complex projects. Stay tuned for more tutorials and exciting projects at Maker Tech Lab!
Happy making!